Fitting a new belt
A Gates belt is a closed loop and cannot be split. To change it, the frame has to open: every Booda frame has a splittable seat stay for this. The belt is slackened and tensioned with the eccentric bottom bracket, not with the rear wheel.
This page describes the steps in general. Opening the frame and setting the tension both affect your safety. If you are not equipped and confident for every step, have the belt changed by us or a bicycle workshop.
Before you start
Section titled “Before you start”- Read Handling the belt without damaging it.
- Check the sprockets: a worn sprocket destroys a new belt (see Belt and sprocket wear).
- Use a belt of the same line and length as the original.
Removing the old belt
Section titled “Removing the old belt”- Mark the position of the eccentric bottom bracket cap against the frame.
- Loosen the 3 bolts on the non-drive-side eccentric cap (4 mm Allen key) and rotate the eccentric with the Booda Bike eccentric BB tool so that the crank axle moves towards the rear wheel. The belt becomes slack.
- Lift the belt off the front sprocket by hand, then off the rear sprocket. Do not lever it off with a tool.
- Open the seat stay joint and pass the belt out of the frame through the gap.
Fitting the new belt
Section titled “Fitting the new belt”- Uncoil the new belt correctly: hold it at chest height and let it open slowly by itself.
- Pass the belt through the gap in the seat stay so that it surrounds the frame correctly, then close the seat stay joint and tighten its bolts to the specified torque.
- Lay the belt on the rear sprocket and then on the front sprocket by hand, with the eccentric still turned towards the rear wheel, so the belt goes on without tension.
- Tension the belt by rotating the eccentric so that the crank axle moves away from the rear wheel. A new belt is set to 50% green and 50% yellow on the Gates tension tester, because it settles once after fitting. See Belt tension.
- Tighten the 3 eccentric bolts evenly to a maximum of 5 Nm, then check the tension again.
- Check the belt line: support the bike, turn the cranks 10–15 times, and check that the belt runs straight and quietly on both sprockets. See Belt alignment.
- Test ride carefully before normal use.
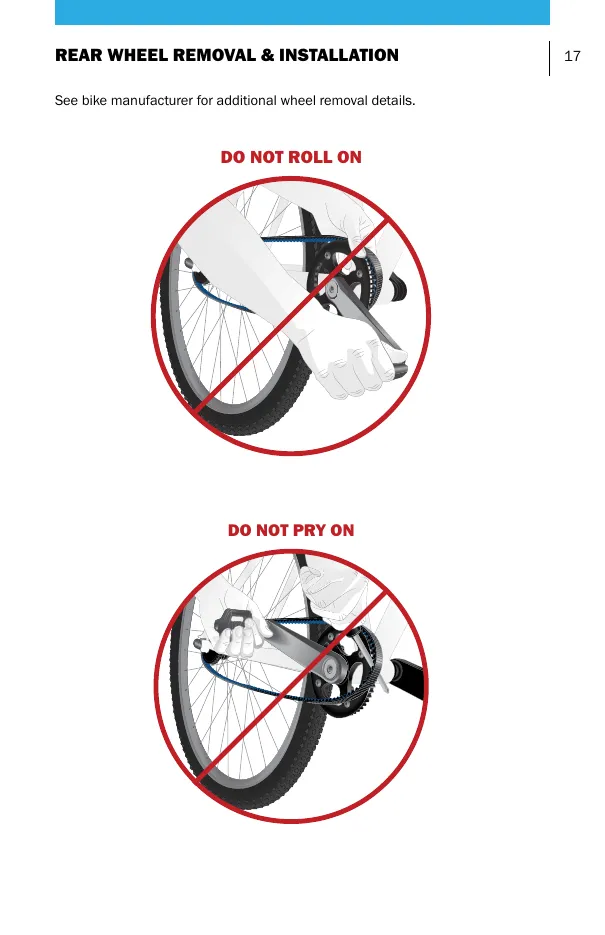
The two mistakes that destroy belts
Section titled “The two mistakes that destroy belts”Almost all belt damage during fitting comes from two errors:
- Fitting the belt under tension: levering, prying or cranking it over a sprocket instead of slackening it with the eccentric first.
- Restraining the belt with something hard: zip ties, pliers, or clamping it in the dropout or against the frame while working.
Both damage the cords inside the belt without visible signs, and can lead to sudden failure while riding.
Removing only the rear wheel
Section titled “Removing only the rear wheel”To remove the rear wheel, for example to fix a puncture, you do not need to open the frame or touch the eccentric: the belt comes off the rear sprocket as the wheel is taken out. See Rear wheel removal with Shimano Alfine or Rohloff rear wheel removal and installation.
What is the correct order for fitting a belt so I do not damage it?
Slacken the belt first by turning the eccentric bottom bracket, pass the belt through the opened seat stay, lay it on both sprockets by hand, then tension it with the eccentric and check tension and belt line. Never lever the belt over a sprocket or force it on by turning the cranks: those are the mistakes that destroy belts.